Difference between revisions of "Technical help"
m (→Savegames and persistent data file) |
m |
||
| Line 14: | Line 14: | ||
== Savegames and persistent data file == | == Savegames and persistent data file == | ||
| − | The {{strong|persistent data file}} contains the scenes you unlocked in the [[cookie jar]], your [[achievement]]s and your preferences. The | + | The {{strong|persistent data file}} contains the scenes you unlocked in the [[cookie jar]], your [[achievement]]s and your preferences. The data are persistent and are only deleted by clicking {{button|Clear Persistent}} button in settings or cookie jar menus. The {{strong|save game files}} contain your progress in the game: with each new savegame created, a new individual file is generated. |
=== Compatibility === | === Compatibility === | ||
Revision as of 19:35, 15 June 2020
Because players regularly ask for support, this article aims to cover the main technical issues. For the story‐related blockings of the game, please follow to the walkthroughs available on the wiki.
Contents
System requirements
Summertime Saga is available for Windows, Linux, macOS and Android. iOS builds are not possible due to Apple’s publishing restrictions. The game uses the Ren’Py software engine, which is light on computer system requirements. 2GB of free space is recommended: 1GB is reserved for downloading, another 1GB for the installation and the saves.
Savegames and persistent data file
The persistent data file contains the scenes you unlocked in the cookie jar, your achievements and your preferences. The data are persistent and are only deleted by clicking Clear Persistent button in settings or cookie jar menus. The save game files contain your progress in the game: with each new savegame created, a new individual file is generated.
Compatibility
The compatibility with saves from previous versions results from an effort by the team members. However it’s not 100% guaranteed because of the many code changes between each stage of development. Therefore, savegames from a too old version cannot be restored and are displayed greyed out with a red icon in the loading menu; savegames dating back to one previous version can be migrated, after a warning message, and appear in sepia color with a yellow icon.
To ensure a better compatibility and prevent conflicts with running events, it’s advisable to load a save done on the map.
Directories
Both savegames and persistent data files are stored in these locations:
- Windows:
<SS-game-folder>\game\savesand%AppData%\RenPy\SummertimeSaga(two locations can coexist) - Android:
Android/data/com.kompasproductions.summertimesaga/files/saves - Mac:
~/Library/RenPy/SummertimeSaga(folder may be hidden) - Linux:
<SS-game-folder>/game/savesand$HOME/.renpy/SummertimeSaga(two locations can coexist) - Other:
%USERPROFILE%\.renpy\SummertimeSaga
Moving a save file
Error creating thumbnail: Unable to save thumbnail to destination | If the same file exists at both save locations, please replace both. |
Save files, whether provided by the game team or by other players, have to be downloaded and moved by following these steps:
- Quit the game.
- Download the save file. Official save file may be provided on the official Summertime Saga website exclusively.
- Move the downloaded file to the location(s) mentioned above; if there are multiple locations, copy to all; create the
savesfolder if it does not yet exist. - Start the game and click on Load Game
- Use the Previous and Next buttons to display the correct loading page. Then click on the thumbnail corresponding to the downloaded save file.
Naming a save file
Save files look like: 1-1-LT1.save
The naming format is as follows pageNumber-pageSlotNumber-LT1.save. For example, 2-3-LT1.save is the save file for the 3rd slot on the 2nd page. 2-3-LT1 (1).save is not a valid save file. In this case, the file must be renamed and the last part (1) must be removed to make it valid.
Quick saves
Quick saves are performed directly in‐game thanks to the Q.Save shortcut at the bottom of the screen. It opens the last one. Six slots are reserved for them under the tab named Q, inside the load screen.
Automatic saves
The game makes automatic savegames at regular intervals, depending on your progress. The last saves are stored in the tab named A, inside the load screen.
Android installation
Summertime Saga app for Android devices is not available on Google Play Store. It must be downloaded from the official website then installed manually. Please follow these steps:
- Removed all previous installs of the game.
- Make sure you have at least 2GB of free space available on your device; 1GB is reserved for downloading, another 1GB is recommended for the installation and the saves.
- You may also need to disable Google Play Protect: open Play Store application, tap on Menu button and select Play Protect option. Disable the options Scan device for security threats.
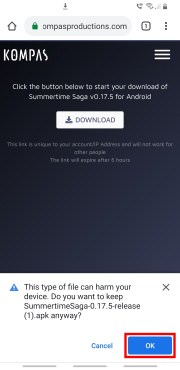
- Download the last version of Summertime Saga on the official website exclusively. Private download servers are provided for Patreon contributors. Choose ANDROID platform and validate.
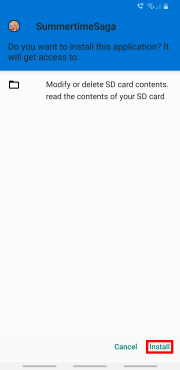
- Open the download folder of the web browser, and click on the file which name begins with
SummertimeSagaand ends with.apk. Do not install the game on an SD card; the app won’t launch from an external storage. - Enable “Unknown sources” setting on your device:
- On Android Nougat or lower: The exact names of the settings entries may vary, but the overall process should be similar. Navigate to your device’s Settings menu, then look for an entry titled either Security or Lock screen and security. Simply tick the box or toggle the switch next to Unknown sources, then press OK on the popup.
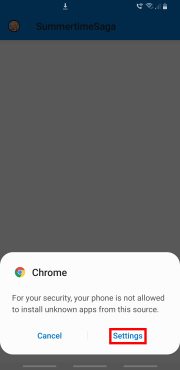
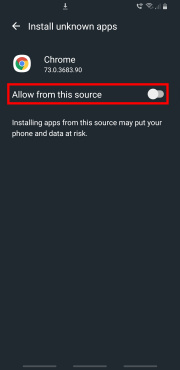
- On Android Oreo or higher: When you launch Summertime Saga install file, you’ll be prompted to allow the permission. Tap Settings on the prompt, then toggle the switch next to Allow from this source on the following screen. Hit the back button, then you can resume installation.
- When the install is completed, open your app folder.


